ShopDreamUp AI ArtDreamUp
Deviation Actions


Suggested Deviants


Suggested Collections


You Might Like…


Featured in Groups


Description
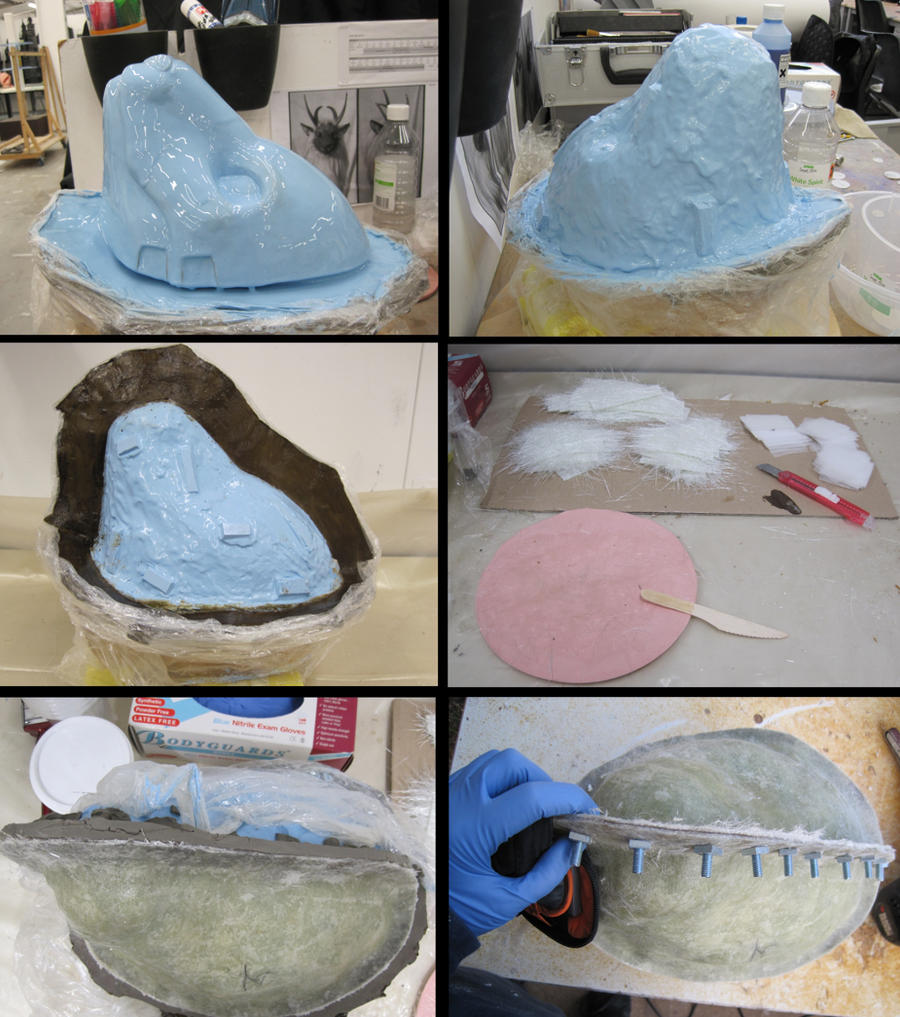
After the sculpt has been walled up, it is ready for moulding.
I used TOMPS Value Range silicone to mould this project, with a slow catalyst. (Although I prefer the fast catalyst, as I am impatient, but it is VERY fast)
The silicone is degassed in a vacuum chamber before being poured on.
The first layer of silicone is a detail layer, and is poured on in a thin layer so it flows into all the details.
The second layer, which is applied after the first layer has cured, is a much thicker layer, which builds up the thickness and strength of the silicone.
I thickened my silicone using cab-o-sil (fumed silica) powder, (but in future I would use a thixotropic additive for the silicone, as I found the cab-o-sil slowed the cure of the silicone)
After the thicker layer has been applied, I put keys into the silicone, so that the fibreglass jacket has something to 'grab hold of'. The keys are little rectangles of silicone I cast out earlier.
Once the silicone has cured, it's time to apply the fibreglass jacket. I walled up down the centre of the mould in clay, and brushed shellac over the clay to seal it, as moisture inhibits the cure of polyester resin.
I wet out my fibreglass on a silicone mat, as it's easy to clean, and is reusable.
The fibreglass jacket consists of a gelcoat layer, then two fibreglass matting layers, finished with a layer of fibreglass tissue, which makes the mould much nicer to handle than a sharp, spiky mess of fibreglass matting.
Once I have glassed out one side of the mould, I trim it with a sharp knife before it cures, to neaten up the mould, and then wait for it to fully cure.
The clay wall is removed, and the fibreglass flange is released with lard (my preferred release agent, as it is cheap and easy to use.)
The glassing process is then repeated for the other half of the mould.
Once both sides of the mould have cured, I drill holes for bolts before taking the mould apart, as this ensures the mould is in the correct place once it is put together.
Next stage is casting out the resin skull.
Image size
2655x3000px 4.51 MB
© 2011 - 2024 differentiation
Comments18
Join the community to add your comment. Already a deviant? Log In
Beautiful moldmaking work! Though usually I see most artists brush or stipple on the "gel" layer of the silicone mold in order to prevent air from being trapped in the detail portions. I presume its a very thin silicone, so that no air would be trapped pouring it on. I do like the idea of split jacket nearing the face, nice move on the seam line.
How did you come about that idea of using a jacket mold, I'm always curious as to how folks make these types of molds and what decisions led to that choice.
How did you come about that idea of using a jacket mold, I'm always curious as to how folks make these types of molds and what decisions led to that choice.